Mostrando postagens com marcador Plugin. Mostrar todas as postagens

domingo, 4 de dezembro de 2011

Debbuging a Plug-In

0 comentários
Make changes / corrections needed, compile and register the plug-in.
Run the Dynamics CRM.
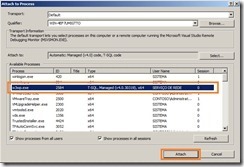
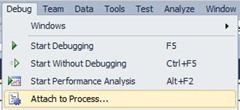
Attach the debugger to the process in Microsoft Dynamics CRM server that will run the plug-in, according to the register configuration of the plug-in, as follows:

          Registration Process                       Configuration
on-line                                              w3wp.exe
offline                                               Microsoft.Crm.Application.Hoster.exe
assíncrona                                        CrmAsyncService.exe
sandbox                                            Microsoft.Crm.Sandbox.WorkerProcess.exe
If there are multiple processes running, for example, multiple w3wp.exe processes, attach the debugger to all instances of the running process.
fig01_thumb2

fig02_thumb

Set one or more breakpoints in your code.

fig04_thumb

Make operations (add / change), Accounts. The application should stop at the desired point.

fig03_thumb

Leia Mais >>

Debugando um Plugin

0 comentários
Faça as alterações/correções necessárias, compile e registre o plug-in.
Execute o Dynamics CRM.
Anexe o depurador ao processo no servidor
Technorati Marcas: ,
do Microsoft Dynamics CRM que irá executar o plug-in, de acordo com a configuração de registro do plug-in, conforme abaixo:

          Registro de configuração                Processo
on-line                                              w3wp.exe
offline                                               Microsoft.Crm.Application.Hoster.exe
assíncrona                                        CrmAsyncService.exe
sandbox                                            Microsoft.Crm.Sandbox.WorkerProcess.exe
Se houver vários processos executados, por exemplo, múltiplos processos w3wp.exe, anexar o depurador a todas as instâncias do processo em execução.
fig01
 
 
fig02
 
Defina um ou mais pontos de interrupção em seu código.
 
fig04
 
Faça as operações (incluir/alterar), em Accounts. A aplicação deverá parar no ponto desejado.
 
fig03
 

Leia Mais >>

segunda-feira, 28 de novembro de 2011

Registrando um Plug-In

0 comentários
Registrando um Plug-In

Agora iremos registrar o plug-in que criamos no post 09. Customization using Visual Studio 2010 (C #) - Plug-In.


Entre no VS 2010, e clique em Toos - Plugin Registration Tool, esta ferramenta, adicionados no post 10. Plugin Registration Tool.

Cliquem em Create New Connection.


Digite um nome para a conexão, e a URL do Dyanamics CRM., e clique em Save.


Selecione a conexão criada e clique em Connect.


Após conexão, clique em Register New Assembly.


Selecione a DLL criada, clique em Load Assembly, e informe os outros campos conforme a figura ao lado, e clique Register Selected Plugins.


Após registrar o Plug-in, selecione o plug-in registrado em clique em Register New Step, e preencha os campos conforme figura ao lado.


Repita o passo anterior, para registrar o passo "Update".


Pronto nosso plug-in está registrado, faça o teste. Ao incluir um conta nova, deverá ser gravado no banco de dados ERP, e ao alterar algum dados em contas o mesmo deverá ser alterado no banco ERP.

O próximo post, iremos ver como debugar o Plug-in.

Leia Mais >>

Registering a Plug-In

0 comentários
Registering a Plug-In

Now we register the plug-in that created the post 09. Customization Using Visual Studio 2010 (C #) - Plug-In.
Enter the VS 2010 and click Toos - Plugin Registration Tool, this tool, added in post 10. Plugin Registration Tool.

Click on Create New Connection.

 
Enter a name for the connection, and the URL of the CRM Dyanamics., And click Save.


Select the created connection and click Connect.


After connection, click Register New Assembly.


Select the DLL created, click Load Assembly and tell the other fields as the figure on the side, and click Register Selected Plugins.


After registering the plug-in, select the plug-in registered click on Register New Step, and fill the fields as the figure.


Repeat the previous step, to register with the "Update".


Ready our plug-in is registered, do the test. When adding a new account should be recorded in the ERP database, and change any data in the same accounts should be changed in the ERP database.

 The next post we will see how to debug the plug-in.

Leia Mais >>

quinta-feira, 24 de novembro de 2011

Plug-In Registration Tool

0 comentários
Plug-In Registration Tool.

   No post 09. Customização usando Visual Studio 2010 (C #) - Plug-In,  criamos um plug-in, agora precisamos registra-lo e fazer os testes.
   Para registrar devemos usar a ferramenta PluginRegistrationTool, que vem junto com o SDK (08. Customização usando Visual Studio 2010 (C#) - Download SDK), mas antes verifique se Windows Identity Foundation, foi instalado (06. IdentityModel (Windows Identity Foundation).
   Se tudo estiver ok, abra o Visual Studio 2010, e abra a solução PluginRegistrationTool.sln, e compile o projeto.


Adicionando a Ferramenta no Visual Studio

Você pode registrar a ferramenta Plug-in Registration como uma ferramenta externa para Visual Studio 2010.
Abra o Visual Studio 2010.
Clique em Tools, clique External Tools, e click Add. Se você ainda não tem nenhuma ferramenta adicionada, clque [New Tool 1].
No campo titulo, digite CRM Plug-in Registration Tool.
No campo Command , click no botão (…) , e localize o executável que foi compilado. Clique Open.
Clique OK para fechar o External Tools dialog box.


Leia Mais >>

Plug-In Registration Tool

0 comentários
Plug-In Registration Tool.

    In the post 09. Customization using Visual Studio 2010 (C #) - Plug-in, create a plug-in, now we need to record it and do the tests.
    To register you must use a tool PluginRegistrationTool, which comes with the SDK (08. Customization Using Visual Studio 2010 (C #) - Download SDK), but make sure that Windows Identity Foundation, was installed (06. IdentityModel (Windows Identity Foundation).
     If everything is ok, open Visual Studio 2010 and open the solution PluginRegistrationTool.sln, and compile the project.


Adding the tool in Visual Studio
You can register the Plug-in Registration tool as an external tool to Visual Studio 2010.
Open Visual Studio 2010.
Click Tools, click External Tools, and click Add If you do not have any additional tools, clque [New Tool 1].
In the Title field, type CRM Plug-in Registration Tool.
In the Command field, click the button (...) and locate the executable that was compiled. Click Open.
Click OK to close the External Tools dialog box.


Leia Mais >>

segunda-feira, 21 de novembro de 2011

Customization using Visual Studio 2010 (C #) - Plug-In

0 comentários
Customization using Visual Studio 2010 (C #) - Plug-In

In the post 07. Customization using Visual Studio 2010 (C #) and 08. Customization using Visual Studio 2010 (C #) - Download the SDK, we began the study of customization using VS 2010. Today we will develop the plug-in to record the data from Dynamics CRM to ERP customer.
Launch Visual Studio 2010 and open a new project by adding a class library.

Name the CadCliente, and select the location where you saved the files in your project and click OK.
We need to sign the bill as follows:
Click right-click properties, and click Open.
Check Sign the Assembly and click in Signing and New

In the field (key file name), tell CadCliente and click OK


Add a new item in the project of type Class with the name of PluginCliente.cs


And insert the following code:

using System;
using System.Collections.Generic;
using System.Text;
using Microsoft.Xrm.Sdk;
using Microsoft.Xrm.Sdk.Query;
using System.Data.SqlClient;

namespace CadCliente
{
public class PluginCliente : IPlugin
{
public void Execute(IServiceProvider serviceProvider)
{
// Pega contexto em execução
IPluginExecutionContext context = (IPluginExecutionContext)serviceProvider.GetService(typeof(IPluginExecutionContext));

if (context.MessageName.ToUpper() == "CREATE")
{
if (context.InputParameters.Contains("Target") && context.InputParameters["Target"] is Entity)
{
// Captura a entidade
Entity targetEntity = (Entity)context.InputParameters["Target"];

if (targetEntity.LogicalName.ToUpper() == "ACCOUNT")
{
// Captura o serviço
IOrganizationServiceFactory serviceFactory = (IOrganizationServiceFactory)serviceProvider.GetService(typeof(IOrganizationServiceFactory));
IOrganizationService service = serviceFactory.CreateOrganizationService(context.UserId);

// String de conexão SQL do banco de dados ERP
string conexao = "Data Source=WIN-4EF7UMIGTTO;Initial Catalog=ERP;Integrated Security=SSPI";

string sql = "Insert into ERP_Cliente (codcliente,nome,endereco,bairro,cidade,estado,cep,telefone) values (@codcliente, @nome, @endereco, @bairro, @cidade, @estado, @cep, @telefone)";
SqlConnection con = new SqlConnection(conexao);
SqlCommand comando = new SqlCommand(sql, con);

comando.Parameters.Add(new SqlParameter("@codcliente", targetEntity["jd_codigo"].ToString()));
comando.Parameters.Add(new SqlParameter("@nome", targetEntity["name"].ToString()));
comando.Parameters.Add(new SqlParameter("@endereco", targetEntity["address1_name"].ToString()));
comando.Parameters.Add(new SqlParameter("@bairro", targetEntity["address1_line1"].ToString()));
comando.Parameters.Add(new SqlParameter("@cidade", targetEntity["address1_city"].ToString()));
comando.Parameters.Add(new SqlParameter("@estado", targetEntity["address1_stateorprovince"].ToString()));
comando.Parameters.Add(new SqlParameter("@cep", targetEntity["address1_postalcode"].ToString()));
comando.Parameters.Add(new SqlParameter("@telefone", targetEntity["telephone1"].ToString()));

try
{
con.Open();
comando.ExecuteNonQuery();
con.Close();
}
catch (Exception ex)
{
return;
}
}
else
{
return;
}
}
else
{
return;
}
}
else if (context.MessageName.ToUpper() == "UPDATE")
{
if (context.InputParameters.Contains("Target") && context.InputParameters["Target"] is Entity)
{
// Captura a entidade.
Entity targetEntity = (Entity)context.InputParameters["Target"];

if (targetEntity.LogicalName.ToUpper() == "ACCOUNT")
{
// Captura o serviço
IOrganizationServiceFactory serviceFactory = (IOrganizationServiceFactory)serviceProvider.GetService(typeof(IOrganizationServiceFactory));
IOrganizationService service = serviceFactory.CreateOrganizationService(context.UserId);

// Id do registro atual
Guid id = (Guid)targetEntity["accountid"];

// captura dados da entidade
Entity entidade = service.Retrieve("account", id, new ColumnSet(true));

// String de conexão SQL do banco de dados ERP
// WIN-4EF7UMIGTTO = Nome da máquina/servidor pode ser substituido por "." (ponto).

string conexao = "Data Source=WIN-4EF7UMIGTTO;Initial Catalog=ERP;Integrated Security=SSPI";
string sql = @"Update ERP_Cliente Set nome = @nome , endereco = @endereco, bairro = @bairro,cidade = @cidade, estado = @estado, cep = @cep,
telefone = @telefone Where codcliente = @codcliente" ;

SqlConnection con = new SqlConnection(conexao);
SqlCommand comando = new SqlCommand(sql, con);

comando.Parameters.Add(new SqlParameter("@codcliente", entidade["jd_codigo"].ToString()));
comando.Parameters.Add(new SqlParameter("@nome", entidade["name"].ToString()));
comando.Parameters.Add(new SqlParameter("@endereco", entidade["address1_name"].ToString()));
comando.Parameters.Add(new SqlParameter("@bairro", entidade["address1_line1"].ToString()));
comando.Parameters.Add(new SqlParameter("@cidade", entidade["address1_city"].ToString()));
comando.Parameters.Add(new SqlParameter("@estado", entidade["address1_stateorprovince"].ToString()));
comando.Parameters.Add(new SqlParameter("@cep", entidade["address1_postalcode"].ToString()));
comando.Parameters.Add(new SqlParameter("@telefone", entidade["telephone1"].ToString()));

try
{
con.Open();
comando.ExecuteNonQuery();
con.Close();
}
catch (Exception ex)
{
return;
}
}
}
}
}
}
}


Build and take out all the errors that may have appeared.
In the next posting we will register the plugin, and how to debug.


Leia Mais >>

Customização usando Visual Studio 2010 (C #) - Plug-In

0 comentários
Customização usando Visual Studio 2010 (C #) - Plug-In

No post 07. Customização usando Visual Studio 2010 (C#) e 08. Customização usando Visual Studio 2010 (C#) - Download SDK, iniciamos o estudo de customização usando o VS 2010. Hoje iremos desenvolver o plug-in para cadastrar os dados do Dynamics CRM para o ERP do cliente.
Inicie o Visual Studio 2010,  e abra um novo projeto adicionando um class library.

Dê o nome de CadCliente, e selecione o local onde será gravado os arquivos do seu projeto e clique em OK.
Precisamos assinar o projeto da seguinte forma:

Cique com botão direito do mouse em properties, e clique com Open.

Check Sign the Assembly and clique em Signing e em New

No campo (key file name), informe CadCliente e clique em Ok


Adicione no projeto um novo item do tipo Class com o nome de PluginCliente.cs


E insira o seguinte código:

using System;
using System.Collections.Generic;
using System.Text;
using Microsoft.Xrm.Sdk;
using Microsoft.Xrm.Sdk.Query;
using System.Data.SqlClient;

namespace CadCliente
{
    public class PluginCliente : IPlugin
    {
        public void Execute(IServiceProvider serviceProvider)
        {
            // Pega contexto em execução
            IPluginExecutionContext context = (IPluginExecutionContext)serviceProvider.GetService(typeof(IPluginExecutionContext));

            if (context.MessageName.ToUpper() == "CREATE")
            {
                if (context.InputParameters.Contains("Target") && context.InputParameters["Target"] is Entity)
                {
                    // Captura a entidade
                    Entity targetEntity = (Entity)context.InputParameters["Target"];

                    if (targetEntity.LogicalName.ToUpper() == "ACCOUNT")
                    {
                        // Captura o serviço
                        IOrganizationServiceFactory serviceFactory = (IOrganizationServiceFactory)serviceProvider.GetService(typeof(IOrganizationServiceFactory));
                        IOrganizationService service = serviceFactory.CreateOrganizationService(context.UserId);

                        // String de conexão SQL do banco de dados ERP
                        string conexao = "Data Source=WIN-4EF7UMIGTTO;Initial Catalog=ERP;Integrated Security=SSPI";

                        string sql = "Insert into ERP_Cliente (codcliente,nome,endereco,bairro,cidade,estado,cep,telefone) values (@codcliente, @nome, @endereco, @bairro, @cidade, @estado, @cep, @telefone)";
                        SqlConnection con = new SqlConnection(conexao);
                        SqlCommand comando = new SqlCommand(sql, con);

                        comando.Parameters.Add(new SqlParameter("@codcliente", targetEntity["jd_codigo"].ToString()));
                        comando.Parameters.Add(new SqlParameter("@nome", targetEntity["name"].ToString()));
                        comando.Parameters.Add(new SqlParameter("@endereco", targetEntity["address1_name"].ToString()));
                        comando.Parameters.Add(new SqlParameter("@bairro", targetEntity["address1_line1"].ToString()));
                        comando.Parameters.Add(new SqlParameter("@cidade", targetEntity["address1_city"].ToString()));
                        comando.Parameters.Add(new SqlParameter("@estado", targetEntity["address1_stateorprovince"].ToString()));
                        comando.Parameters.Add(new SqlParameter("@cep", targetEntity["address1_postalcode"].ToString()));
                        comando.Parameters.Add(new SqlParameter("@telefone", targetEntity["telephone1"].ToString()));

                        try
                        {
                            con.Open();
                            comando.ExecuteNonQuery();
                            con.Close();
                        }
                        catch (Exception ex)
                        {
                            return;
                        }
                    }
                    else
                    {
                        return;
                    }
                }
                else
                {
                    return;
                }
            }
            else if (context.MessageName.ToUpper() == "UPDATE")
            {
                if (context.InputParameters.Contains("Target") && context.InputParameters["Target"] is Entity)
                {
                    // Captura a entidade.
                    Entity targetEntity = (Entity)context.InputParameters["Target"];

                    if (targetEntity.LogicalName.ToUpper() == "ACCOUNT")
                    {
                        // Captura o serviço
                        IOrganizationServiceFactory serviceFactory = (IOrganizationServiceFactory)serviceProvider.GetService(typeof(IOrganizationServiceFactory));
                        IOrganizationService service = serviceFactory.CreateOrganizationService(context.UserId);

                        // Id do registro atual
                        Guid id = (Guid)targetEntity["accountid"];

                        // captura dados da entidade
                        Entity entidade = service.Retrieve("account", id, new ColumnSet(true));

                        // String de conexão SQL do banco de dados ERP
                        // WIN-4EF7UMIGTTO = Nome da máquina/servidor pode ser substituido por "." (ponto).

                        string conexao = "Data Source=WIN-4EF7UMIGTTO;Initial Catalog=ERP;Integrated Security=SSPI";
                        string sql = @"Update ERP_Cliente Set nome = @nome , endereco = @endereco, bairro = @bairro,cidade = @cidade, estado = @estado, cep = @cep,
                                                              telefone = @telefone Where codcliente = @codcliente" ;

                        SqlConnection con = new SqlConnection(conexao);
                        SqlCommand comando = new SqlCommand(sql, con);

                        comando.Parameters.Add(new SqlParameter("@codcliente", entidade["jd_codigo"].ToString()));
                        comando.Parameters.Add(new SqlParameter("@nome", entidade["name"].ToString()));
                        comando.Parameters.Add(new SqlParameter("@endereco", entidade["address1_name"].ToString()));
                        comando.Parameters.Add(new SqlParameter("@bairro", entidade["address1_line1"].ToString()));
                        comando.Parameters.Add(new SqlParameter("@cidade", entidade["address1_city"].ToString()));
                        comando.Parameters.Add(new SqlParameter("@estado", entidade["address1_stateorprovince"].ToString()));
                        comando.Parameters.Add(new SqlParameter("@cep", entidade["address1_postalcode"].ToString()));
                        comando.Parameters.Add(new SqlParameter("@telefone", entidade["telephone1"].ToString()));

                        try
                        {
                            con.Open();
                            comando.ExecuteNonQuery();
                            con.Close();
                        }
                        catch (Exception ex)
                        {
                            return;
                        }
                    }
                }
            }
        }
    }
}


Compile e tire todos os erros que podem ter aparecido.
Nas próximas postagem iremos registrar o plugin, e como debugar.


Leia Mais >>

terça-feira, 15 de novembro de 2011

Customization using Visual Studio 2010 (C #) - Download the SDK

0 comentários
Customization using Visual Studio 2010 (C #) - Download the SDK
Before starting the development of the plugin mentioned in post 07. Customization using Visual Studio 2010 (C #), we must download the Microsoft Dynamics CRM 2011 SDK, and install on the machine, preferably where you installed the Microsoft Dynamics CRM 2011.
The Software Development Kit (SDK) contains information for developers writing server side code, custom business logic, integration modules, workflow, and plug-ins. It provides an architectural overview of Microsoft Dynamics CRM entity model, security model, and Web services code example and guidance is provided to guide you through the new features. It also contains information for developers customizing the Web client or Microsoft Dynamics CRM for Microsoft Office Outlook, including scripting, integration of custom Web pages, and a lot of sample code.

Besides the documentation, including tools for development.

Related Post:
07. Customization using Visual Studio 2010 (C #)


Leia Mais >>

Customização usando Visual Studio 2010 (C#) - Download SDK

0 comentários
Customização usando Visual Studio 2010 (C#) - Download SDK

Antes de iniciarmos o desenvolvimento do Plugin citado no post 07. Customização usando Visual Studio 2010 (C#), devemos fazer o download do Microsoft Dynamics CRM 2011 SDK, e instalar na máquina, preferencialmente onde está instalado o Microsoft Dynamics CRM 2011.

O Software Development Kit (SDK) contém informações para desenvolvedores escrever código do lado do servidor, lógica de negócios personalizada, módulos de integração, fluxo de trabalho, e plug-ins. Ele fornece uma visão geral da arquitetura do Microsoft Dynamics CRM, modelo de entidade, modelo de segurança, e serviços Web. Código de exemplo e são fornecidas orientações para guiá-lo através dos novos recursos. Ele também contém informações para desenvolvedores personalizar o cliente Web ou o Microsoft Dynamics CRM para Microsoft Office Outlook, incluindo scripting, integração de páginas Web personalizados, e um monte de código de exemplo.

Além da documentação, inclui ferramentas necessárias para o desenvolvimento.
Post Relacionado:
07. Customização usando Visual Studio 2010 (C#)

Leia Mais >>

sábado, 12 de novembro de 2011

Customization using Visual Studio 2010 (C #)

0 comentários
Customization using Visual Studio 2010 (C #)

Hello,


     My previous posts were doing customizations using javascript, and how to find a few blogs .Net (C #), following my posts will have examples of how to customize the Dynamics CRM using Visual Studio 2010 (C #).
    Suppose that our customer asked to write a customer (Account), the same is recorded in the database already exists in the customer's ERP. For this solution we will develop a plugin.
     
     To start it, have on their machines:
         - SQL Server
         - Dynamics CRM 2011
         - Visual Studio 2010

      To simulate the database client, we create a database in SQL as follows:    
         - Create a database with the name ERP

          .


         - In the ERP database, create the Customer table, with the following structure


       In the next post we will develop the Plugin, see you soon.

Leia Mais >>

Customização usando Visual Studio 2010 (C#)

0 comentários
Customização usando Visual Studio 2010 (C#)

Olá,
    Meus posts anteriores foram customizações usando o javascript, e como encontramos poucos blogs em .Net (C#), meus posts seguintes terão exemplos de como customizar o Dynamics CRM, utilizando o Visual Studio 2010 (C#).

     Suponhamos que o nosso cliente solicitou que ao gravar um cliente (Account), o mesmo seja gravado no banco de dados já existente no ERP do cliente. Para esta solução iremos desenvolver um Plugin.

     Para comerçamos, tenham em suas máquinas:
        - SQL Server
        - Dynamics CRM 2011
        - Visual Studio 2010

     Para simular o banco de dados do cliente, iremos criar um banco no SQL conforme abaixo:
        - Crie um banco de dados com o nome ERP.


        - No banco de dados ERP, crie a tabela Cliente, com a seguinte estrutura


      No próximo post iremos desenvolver o Plugin, até breve.

Leia Mais >>

Arquivo do blog

Números de Visitas


TOPO